domingo, 9 de enero de 2011
Para hacer un jabón a capas y que éstas queden lo más rectas posibles, solo hay que esperar antes de añadir la siguiente capa a que el jabón esté un poco duro. Puedes hacer la primera capa, taparla y comenzar a hacer la siguiente, en cuanto veas que la primera capa ha dejado de moverse.
Puedes utilizar distintas fórmulas en las capas que vas a hacer, aunque me gusta utilizar la misma concentración en todas ellas para evitar sorpresas.
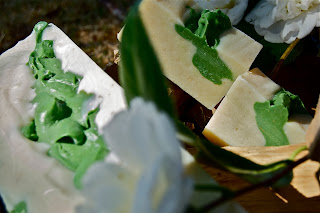
El jabón de la foto tiene cuatro capas finas que rodean el dibujo. Hacer ésto no es complicado, solo hay que tener un poco de paciencia:
Primero se hace la capa de abajo. Una capa fina de 0,5 cm de altura aproximadamente. y dejamos reposar hasta que no baile y endurezca un poco.
Un truco para que endurezcan antes, es sustituir el agua por leche de almendras, pues al tener tan poca cantidad, ayudarás a que se endurezca antes.
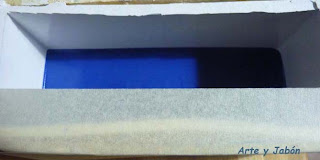
Después ponemos cinta de carrocero en la parte de arriba de una de las paredes del molde para que al tumbarlo, haga de tope de la siguiente forma:
Tumbamos el molde y añadimos la siguiente capa con cuidado y dejamos que se asiente, hasta que endurezca y esté firme:
Cuando la capa esté firme, repetimos este paso con la pared que nos queda. Cuando la tercera capa está firme, rellenamos como más nos guste, en este caso seguí haciendo capas, alguna con remolinos.
La última capa, que cierra el cuadrado es también una capa fina en la que puse algún remolino.
Tengo que dar las gracias a Maribel del blog: muchaespumita ella es una de nuestras maestras y la que nos inspiró para poder hacer éste jabón.
Espero que os haya gustado, y como siempre que os animéis a probarlo, ya me contaréis que tal fue...
Feliz semana a todos.
Hello to all again. Today I bring you a soap that remember
me a bit a ceramics art. It is done with seven layers, But if you are a beginer,
you can do it in a simpler way, You can do a soap with two or three layers
only. If you have never done soap, you should read this before: How to make soap.
If you want to make a soap with layers and you want it nice and
uniforms.., between each layer you have to wait for the soap to become a little
hard. Sometimes in some minutes the layer is ready.
You can make the first layer, and cover it, then you can
begin to do the following one, when you see the first layer has
stopped moving.
You can use different formulae in the layer that you are
going to do, though I like to use the same recipe in all of them.
The photo´s soap is done with four thin layers that surround
the drawing.
First we do the bottom layer. It's a thin layer of 0,5 cm.
We must wait until this first layer has stopped moving.
A trick: replace the
water with milk of almond.
Later, we seal the above part of the mold with tape, see the picture.
Thin layers are done only by turning the mold. First you
turn the mold to the right side, and then, when this layer has stopped moving, you
turn the mold to the left side, see the picture.
Later on, we can continue making layers or just put soap. In
someone of the layers you can make swirls. I finished this soap with a thin cap
with swirls.
Thanks to Maribel of muchaespumita. It's one of our
teachers and the one that have inspired us to make this soap.
I hope you like it, and let me know how it goes…
Happy week for all.


